> ## Documentation Index
> Fetch the complete documentation index at: https://support.xraysim.com/llms.txt
> Use this file to discover all available pages before exploring further.
# Shoulder Simulation
> Quick reference for supported shoulder views, wall bucky setup, movement, bone variations, and current limitations.
## Quick reference
| Question | What to expect |
| ------------------------------------ | --------------------------------------------------------------------------------------------------------------------- |
| **Which projections are confirmed?** | AP abducted, PA tangential, and apical shoulder views. |
| **Can users try other projections?** | **Yes.** These are confirmed examples. Other projections may be possible when the simulated setup supports them. |
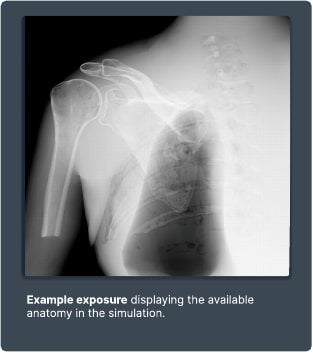
| **What anatomy is included?** | Humerus, scapula, clavicle, partial ribs 1-6, upper thoracic spine, and lower cervical spine. |
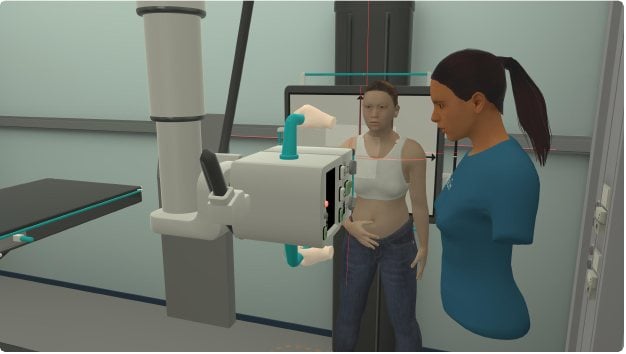
| **What setup is used?** | Wall bucky workflow with tube lock and detent support. |
| **What movement is included?** | Patient axial rotation, anteroposterior adjustment, mediolateral adjustment, and shoulder internal/external rotation. |
| **What bone variations exist?** | Healthy bone version and proximal humerus fracture variation. |
| **Known limitation** | Active scapular movement through arm extension or flexion is not included. |
The projections listed on this page are confirmed examples for this simulation module. They do not define the full limit of what can be attempted. The simulator creates an image from the selected anatomy, patient position, joint movement, detector setup, tube position, collimation, and exposure settings, so other projections may be possible when the setup supports them.
## Visual examples
 ## Imaging capabilities
| Capability | Details |
| --------------------- | -------------------------------------------------------------------------------------------------------------------------------------------------------------------------------------------------------------- |
| Radiographic tube | Full range of motion, including vertical, horizontal, tilt, and rotation. The cassette can be rotated, and collimation size is adjustable. |
| Detector methods | The tube locks and detents to the wall bucky, enabling standard bucky tray operation. |
| Confirmed projections | Confirmed examples include AP abducted, PA tangential, and apical views. They do not define the full limit of what can be attempted. Other projections may be possible when the simulated setup supports them. |
## Anatomy and movement
| Area | Details |
| ---------------- | --------------------------------------------------------------------------------------------------------------------------------- |
| Included anatomy | Primary bones: humerus, scapula, clavicle. Adjacent structures: ribs 1-6 partial, upper thoracic spine, and lower cervical spine. |
| Joint mobility | Patient axial rotation, anteroposterior adjustment, and mediolateral adjustment. Shoulder internal and external rotation. |
## Bone variations
* Healthy bone version
* Pathological version featuring a proximal humerus fracture
## Known limitations
The patient can rotate the shoulder joint, but arm movement that would reposition the scapula backward or forward is not yet supported. Standard internal and external rotation is simulated, but active scapular motion through arm extension or flexion is not included in this version.
## Imaging capabilities
| Capability | Details |
| --------------------- | -------------------------------------------------------------------------------------------------------------------------------------------------------------------------------------------------------------- |
| Radiographic tube | Full range of motion, including vertical, horizontal, tilt, and rotation. The cassette can be rotated, and collimation size is adjustable. |
| Detector methods | The tube locks and detents to the wall bucky, enabling standard bucky tray operation. |
| Confirmed projections | Confirmed examples include AP abducted, PA tangential, and apical views. They do not define the full limit of what can be attempted. Other projections may be possible when the simulated setup supports them. |
## Anatomy and movement
| Area | Details |
| ---------------- | --------------------------------------------------------------------------------------------------------------------------------- |
| Included anatomy | Primary bones: humerus, scapula, clavicle. Adjacent structures: ribs 1-6 partial, upper thoracic spine, and lower cervical spine. |
| Joint mobility | Patient axial rotation, anteroposterior adjustment, and mediolateral adjustment. Shoulder internal and external rotation. |
## Bone variations
* Healthy bone version
* Pathological version featuring a proximal humerus fracture
## Known limitations
The patient can rotate the shoulder joint, but arm movement that would reposition the scapula backward or forward is not yet supported. Standard internal and external rotation is simulated, but active scapular motion through arm extension or flexion is not included in this version.