> ## Documentation Index
> Fetch the complete documentation index at: https://support.xraysim.com/llms.txt
> Use this file to discover all available pages before exploring further.
# Running the VR X-ray Simulator as a Kiosk
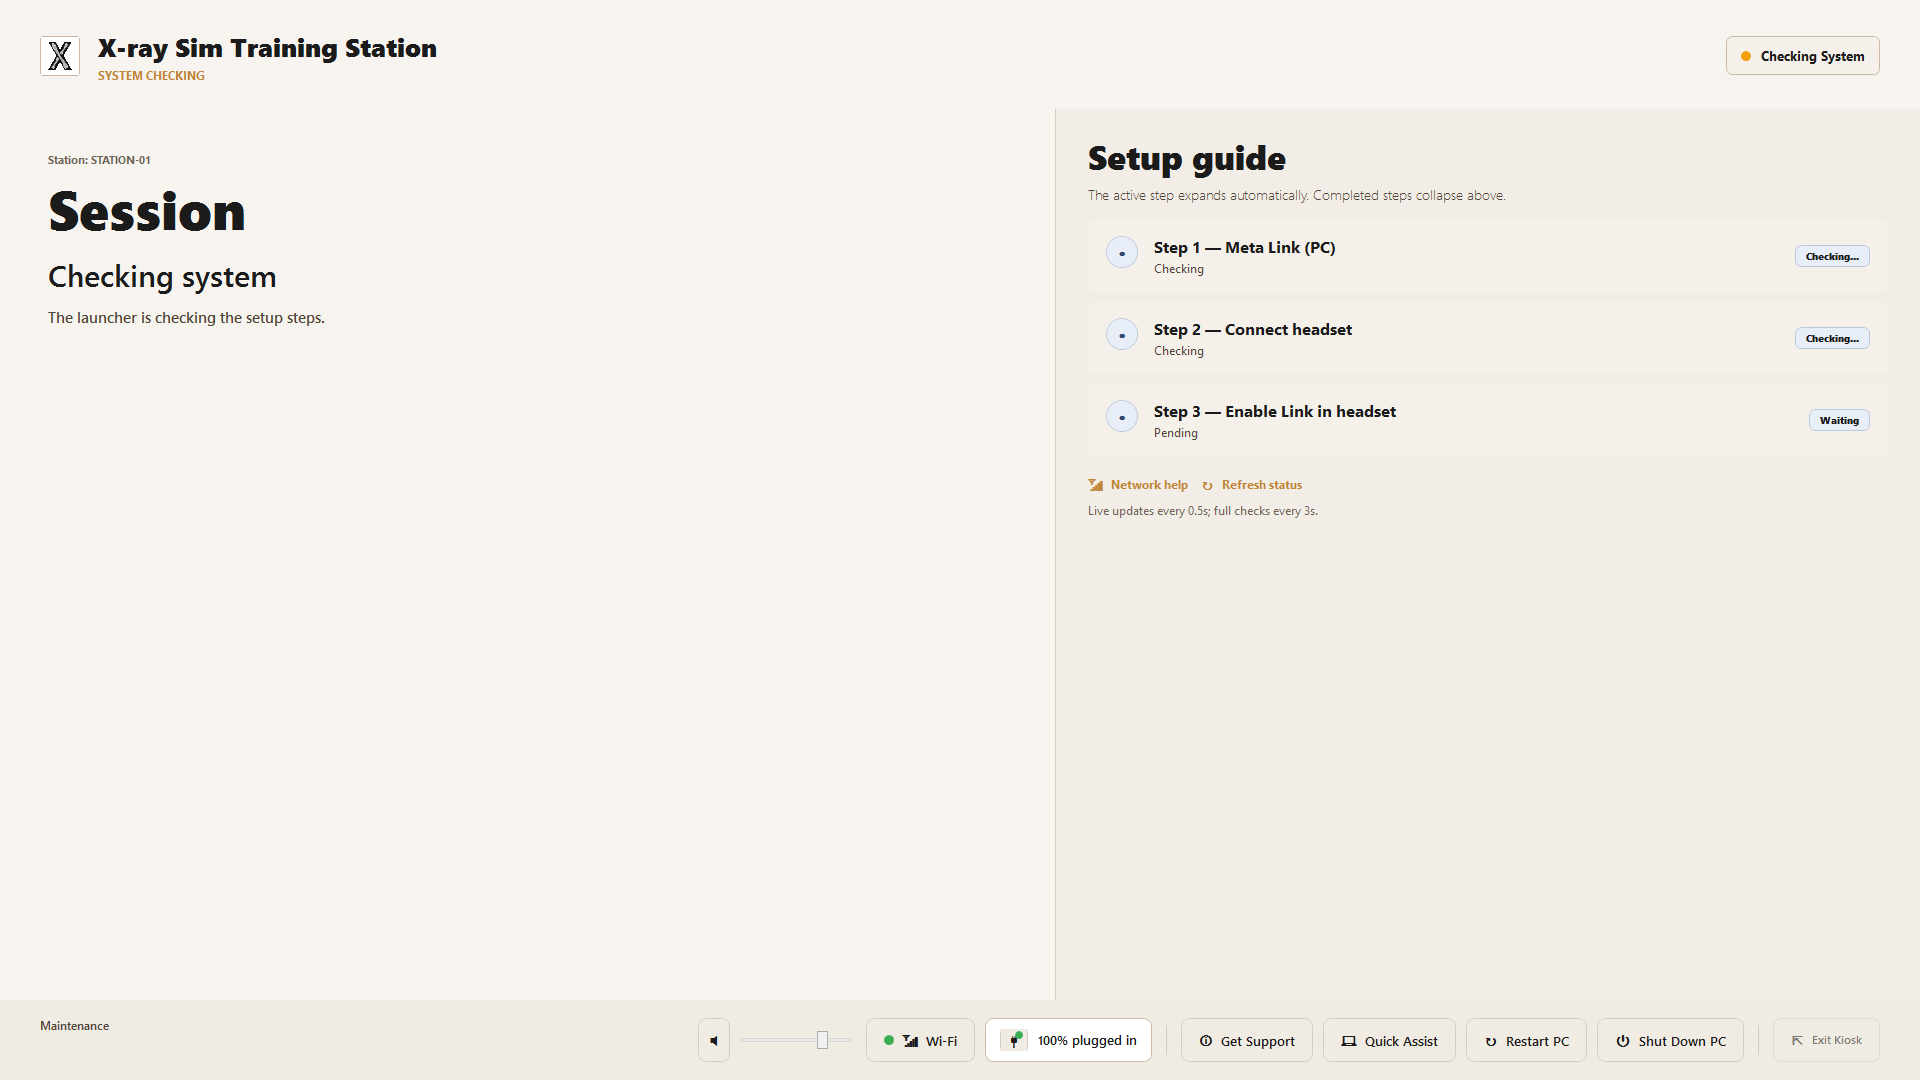
The VitaSim Launcher turns a Windows 11 PC running the VR X-Ray Simulator into a controlled kiosk. Once installed, the launcher becomes the full-screen home screen at sign-in, walks students through Meta Link, the headset, and the Enable Link step, and only starts the simulator when the station is actually ready. Students never see the Windows desktop.
This guide is for an existing station that today runs only the VR X-Ray Simulator. If the simulator is not installed yet, complete the [VR X-Ray Simulator setup](/Tech/Setup-and-installation-guides/VR-X-ray-Simulator-Setup) first, then come back here.
 ## Before you start
A few practical things will save you time during the upgrade.
Read this guide on a phone, tablet, or second laptop — not on the PC you are upgrading. Once kiosk mode is on, you will not have easy access to a browser on the station itself.
* **Plug the PC into power.** Do not run the upgrade on battery. A sign-out or reboot on an empty battery part-way through can leave the operator account in a half-configured state.
* **Connect to a stable network.** You will download the launcher installer, sign Meta Link in, and verify the simulator can reach the VitaSim portal. Wi-Fi works, but a wired connection is more reliable.
* **Know the install paths** for the VR X-Ray Simulator and Meta Link on this PC. The defaults are:
* Simulator: `C:\Program Files\VR X-Ray Simulator\VR X-Ray Simulator.exe`
* Meta Link: `C:\Program Files\Meta Horizon\Support\oculus-client\client.exe`
* **Choose an admin PIN** that staff will use to exit the kiosk. See [About the admin PIN](#about-the-admin-pin) below.
A separate Windows admin account is useful as a recovery option but is not required. The upgrade works on a PC with a single account.
## Step 1: Confirm the simulator works on its own
Open the VR X-Ray Simulator the way you do today and complete a normal session — connect the headset, enable Link, sign in, and use the simulator for a few minutes.
Anything that fails now will still fail under the launcher. The launcher surfaces these issues as support codes rather than fixing them. If you hit problems here, see [Troubleshooting](/Guides/detailed-setup-guide#troubleshooting) and [How to set up Meta Quest Link](/Tech/how-to-setup-meta-quest-link) first.
## Step 2: Install the VitaSim Launcher
[Download the VitaSim Launcher installer 2026.5.12.0](https://storage.googleapis.com/platform-builds/x-ray-simulator/VitaSimKiosk/production/VitaSimLauncher_2026.5.12.0.exe) and run it on the station
The installer places the launcher and its scripts under `C:\VitaSim\`.
If your institution manages software through an MDM system (Intune and similar), hand the launcher install over to your IT team. It follows the same silent-install pattern documented in [MDM deployment instructions](/Tech/mdm-deployment-instructions).
Open `C:\VitaSim\config.local.json` and set the values for this PC:
```json theme={null}
{
"VrSimPath": "C:\\Program Files\\VR X-Ray Simulator\\VR X-Ray Simulator.exe",
"MetaLinkPath": "C:\\Program Files\\Meta Horizon\\Support\\oculus-client\\client.exe",
"StationId": "STATION-01",
"AdminPinHash": ""
}
```
`StationId` is the label this station reports in the support dialog. Use whatever your site calls the PC. `AdminPinHash` is covered in the next section.
## About the admin PIN
The default admin password is "**2019"** and it will stay if you do not change it.
The PIN protects the kiosk from being exited by students. The launcher uses it in two places:
* The `Exit Kiosk` button on the maintenance bar, which drops staff out to the Windows desktop.
* Confirmation dialogs shown before installing launcher or simulator updates.
The PIN never leaves the PC and is never stored in plain text. The launcher only keeps a SHA-256 hash of it in `config.json`, and compares hashes when staff type the PIN in.
**Choosing a PIN**
* Six digits or more, so students cannot guess it after watching staff type it once.
* Do not reuse a PIN staff already use for door codes, payroll, or their phone.
* Share it only with people who do maintenance on the station. Teachers usually do not need it.
* Write it down somewhere that survives staff turnover. If the PIN is lost, the only way back in is to re-deploy the config file.
**Generating the hash**
Use any SHA-256 tool to hash your chosen PIN, then paste the result into `AdminPinHash`. A simple option that runs entirely in your browser (the PIN never leaves your device) is [emn178.github.io/online-tools/sha256.html](https://emn178.github.io/online-tools/sha256.html). Type the PIN into the input box and copy the 64-character hex string from the output. Staff type the actual PIN at the kiosk; only the hash goes into the config file.
## Step 3: Test the launcher in windowed mode
Before locking the PC into kiosk mode, run the launcher as a normal app.
1. Start `C:\VitaSim\VitaSimLauncher.exe`.
2. Wait for the three setup steps to turn ready: `Meta Link (PC)`, `Headset (USB)`, and `Enable Link in headset`.
3. Press `Start X-ray Simulator` and verify a full training session runs end-to-end.
4. Open `Get Support` and confirm the station ID, launcher version, and simulator version look right.
If a step does not turn ready, fix it now. The support code shown in `Get Support` is the same code our team will ask for.
## Step 4: Switch to kiosk mode
Kiosk mode is enabled by setting the launcher as the Windows shell for the current user. This is one registry value, and you set it from PowerShell.
This step changes how Windows signs the current user in. Make sure Step 3 succeeded before continuing, and only run the command for the account you want to turn into the kiosk.
Open PowerShell on the operator account and run:
```powershell theme={null}
Set-ItemProperty `
-Path "HKCU:\Software\Microsoft\Windows NT\CurrentVersion\Winlogon" `
-Name "Shell" `
-Value "C:\VitaSim\VitaSimLauncher.exe"
```
That writes:
```text theme={null}
HKCU\Software\Microsoft\Windows NT\CurrentVersion\Winlogon
Shell = C:\VitaSim\VitaSimLauncher.exe
```
Sign out and sign back in. The launcher should open full-screen with no desktop, no taskbar, and no Start menu. The PC is now a kiosk station.
## Exit kiosk mode
Press `Exit Kiosk` on the bottom maintenance bar and enter your admin PIN. Explorer opens for the current session, and the launcher returns at the next sign-in.
In PowerShell on the operator account, run the command in the next section to restore Explorer, then sign out and back in.\\
To roll the PC back to a normal Windows desktop, run:
```powershell theme={null}
Set-ItemProperty `
-Path "HKCU:\Software\Microsoft\Windows NT\CurrentVersion\Winlogon" `
-Name "Shell" `
-Value "explorer.exe"
```
Sign out and sign back in. The account behaves like a normal Windows desktop again.
## If something goes wrong
If the account signs in to a black screen after the shell switch:
1. Press Ctrl+Shift+Esc to open Task Manager. From the menu, choose `Run new task`, type `explorer.exe`, and press Enter. You now have a desktop for the current session. Open PowerShell and run the restore command in [Exit kiosk mode](#exit-kiosk-mode) to make it permanent.
2. If Task Manager will not open, boot into Safe Mode and run the same restore command from there.
The recovery window that the launcher shows after a crash still works inside kiosk mode and includes the support code our team will ask for.
## Need help?
If you run into issues during installation or setup:
* Visit the Support Center: [support.xraysim.com](https://support.xraysim.com)
* Email us at [support@vitasim.dk](mailto:support@vitasim.dk)
## Book a Free Upgrade Assistance Session
Would you prefer a guided walkthrough? You can book a free one-on-one online (MS Teams) session with our support team and we will run the upgrade with you: Book Upgrade Assistance.
[Book Upgrade Assistance.](https://meetings-eu1.hubspot.com/anders-winter/assisted-upgrade-for-x-ray-simulator-staff-support)
## Before you start
A few practical things will save you time during the upgrade.
Read this guide on a phone, tablet, or second laptop — not on the PC you are upgrading. Once kiosk mode is on, you will not have easy access to a browser on the station itself.
* **Plug the PC into power.** Do not run the upgrade on battery. A sign-out or reboot on an empty battery part-way through can leave the operator account in a half-configured state.
* **Connect to a stable network.** You will download the launcher installer, sign Meta Link in, and verify the simulator can reach the VitaSim portal. Wi-Fi works, but a wired connection is more reliable.
* **Know the install paths** for the VR X-Ray Simulator and Meta Link on this PC. The defaults are:
* Simulator: `C:\Program Files\VR X-Ray Simulator\VR X-Ray Simulator.exe`
* Meta Link: `C:\Program Files\Meta Horizon\Support\oculus-client\client.exe`
* **Choose an admin PIN** that staff will use to exit the kiosk. See [About the admin PIN](#about-the-admin-pin) below.
A separate Windows admin account is useful as a recovery option but is not required. The upgrade works on a PC with a single account.
## Step 1: Confirm the simulator works on its own
Open the VR X-Ray Simulator the way you do today and complete a normal session — connect the headset, enable Link, sign in, and use the simulator for a few minutes.
Anything that fails now will still fail under the launcher. The launcher surfaces these issues as support codes rather than fixing them. If you hit problems here, see [Troubleshooting](/Guides/detailed-setup-guide#troubleshooting) and [How to set up Meta Quest Link](/Tech/how-to-setup-meta-quest-link) first.
## Step 2: Install the VitaSim Launcher
[Download the VitaSim Launcher installer 2026.5.12.0](https://storage.googleapis.com/platform-builds/x-ray-simulator/VitaSimKiosk/production/VitaSimLauncher_2026.5.12.0.exe) and run it on the station
The installer places the launcher and its scripts under `C:\VitaSim\`.
If your institution manages software through an MDM system (Intune and similar), hand the launcher install over to your IT team. It follows the same silent-install pattern documented in [MDM deployment instructions](/Tech/mdm-deployment-instructions).
Open `C:\VitaSim\config.local.json` and set the values for this PC:
```json theme={null}
{
"VrSimPath": "C:\\Program Files\\VR X-Ray Simulator\\VR X-Ray Simulator.exe",
"MetaLinkPath": "C:\\Program Files\\Meta Horizon\\Support\\oculus-client\\client.exe",
"StationId": "STATION-01",
"AdminPinHash": ""
}
```
`StationId` is the label this station reports in the support dialog. Use whatever your site calls the PC. `AdminPinHash` is covered in the next section.
## About the admin PIN
The default admin password is "**2019"** and it will stay if you do not change it.
The PIN protects the kiosk from being exited by students. The launcher uses it in two places:
* The `Exit Kiosk` button on the maintenance bar, which drops staff out to the Windows desktop.
* Confirmation dialogs shown before installing launcher or simulator updates.
The PIN never leaves the PC and is never stored in plain text. The launcher only keeps a SHA-256 hash of it in `config.json`, and compares hashes when staff type the PIN in.
**Choosing a PIN**
* Six digits or more, so students cannot guess it after watching staff type it once.
* Do not reuse a PIN staff already use for door codes, payroll, or their phone.
* Share it only with people who do maintenance on the station. Teachers usually do not need it.
* Write it down somewhere that survives staff turnover. If the PIN is lost, the only way back in is to re-deploy the config file.
**Generating the hash**
Use any SHA-256 tool to hash your chosen PIN, then paste the result into `AdminPinHash`. A simple option that runs entirely in your browser (the PIN never leaves your device) is [emn178.github.io/online-tools/sha256.html](https://emn178.github.io/online-tools/sha256.html). Type the PIN into the input box and copy the 64-character hex string from the output. Staff type the actual PIN at the kiosk; only the hash goes into the config file.
## Step 3: Test the launcher in windowed mode
Before locking the PC into kiosk mode, run the launcher as a normal app.
1. Start `C:\VitaSim\VitaSimLauncher.exe`.
2. Wait for the three setup steps to turn ready: `Meta Link (PC)`, `Headset (USB)`, and `Enable Link in headset`.
3. Press `Start X-ray Simulator` and verify a full training session runs end-to-end.
4. Open `Get Support` and confirm the station ID, launcher version, and simulator version look right.
If a step does not turn ready, fix it now. The support code shown in `Get Support` is the same code our team will ask for.
## Step 4: Switch to kiosk mode
Kiosk mode is enabled by setting the launcher as the Windows shell for the current user. This is one registry value, and you set it from PowerShell.
This step changes how Windows signs the current user in. Make sure Step 3 succeeded before continuing, and only run the command for the account you want to turn into the kiosk.
Open PowerShell on the operator account and run:
```powershell theme={null}
Set-ItemProperty `
-Path "HKCU:\Software\Microsoft\Windows NT\CurrentVersion\Winlogon" `
-Name "Shell" `
-Value "C:\VitaSim\VitaSimLauncher.exe"
```
That writes:
```text theme={null}
HKCU\Software\Microsoft\Windows NT\CurrentVersion\Winlogon
Shell = C:\VitaSim\VitaSimLauncher.exe
```
Sign out and sign back in. The launcher should open full-screen with no desktop, no taskbar, and no Start menu. The PC is now a kiosk station.
## Exit kiosk mode
Press `Exit Kiosk` on the bottom maintenance bar and enter your admin PIN. Explorer opens for the current session, and the launcher returns at the next sign-in.
In PowerShell on the operator account, run the command in the next section to restore Explorer, then sign out and back in.\\
To roll the PC back to a normal Windows desktop, run:
```powershell theme={null}
Set-ItemProperty `
-Path "HKCU:\Software\Microsoft\Windows NT\CurrentVersion\Winlogon" `
-Name "Shell" `
-Value "explorer.exe"
```
Sign out and sign back in. The account behaves like a normal Windows desktop again.
## If something goes wrong
If the account signs in to a black screen after the shell switch:
1. Press Ctrl+Shift+Esc to open Task Manager. From the menu, choose `Run new task`, type `explorer.exe`, and press Enter. You now have a desktop for the current session. Open PowerShell and run the restore command in [Exit kiosk mode](#exit-kiosk-mode) to make it permanent.
2. If Task Manager will not open, boot into Safe Mode and run the same restore command from there.
The recovery window that the launcher shows after a crash still works inside kiosk mode and includes the support code our team will ask for.
## Need help?
If you run into issues during installation or setup:
* Visit the Support Center: [support.xraysim.com](https://support.xraysim.com)
* Email us at [support@vitasim.dk](mailto:support@vitasim.dk)
## Book a Free Upgrade Assistance Session
Would you prefer a guided walkthrough? You can book a free one-on-one online (MS Teams) session with our support team and we will run the upgrade with you: Book Upgrade Assistance.
[Book Upgrade Assistance.](https://meetings-eu1.hubspot.com/anders-winter/assisted-upgrade-for-x-ray-simulator-staff-support)